The Beginner Painting Sequence: Prime, Base, Shade, Highlight
Learn the four core miniature painting steps in order: priming, base coating, shading, and highlighting. A practical guide for total beginners.
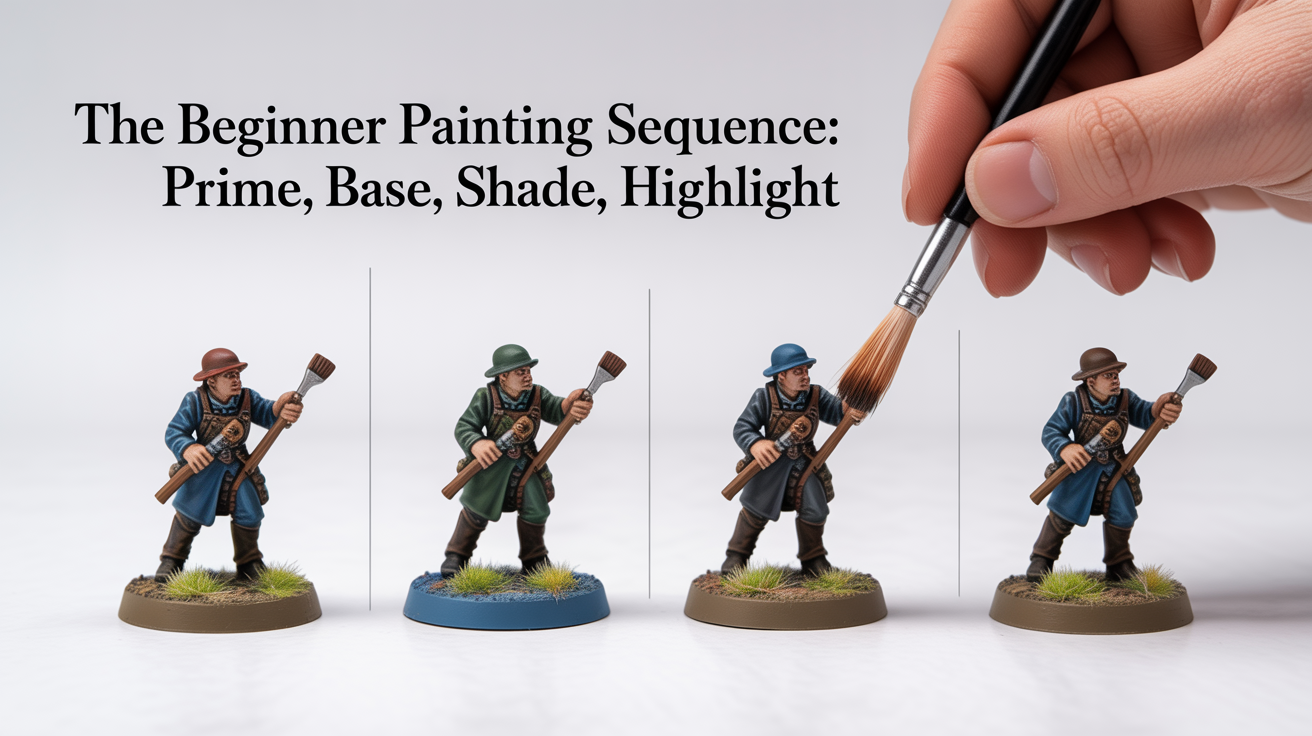
If you are staring at an unpainted model wondering where to begin, the answer is simpler than most tutorials make it sound. The miniature painting process follows four steps in a reliable order: prime, base coat, shade, highlight. Once you understand why each step comes where it does, the whole workflow clicks into place and you can apply it to any model.
This guide walks through each stage, what it accomplishes, and the mistakes to avoid.
Step 1: Prime the Model
Priming is the first step every time, with no exceptions. Primer is a thin coating applied before any colored paint. Its job is to give the paint something to grip. Bare plastic or metal is often too smooth for acrylic paint to adhere cleanly, and paint applied without primer tends to flake off or pool in odd ways.
Most beginners use a rattle-can spray primer. When you spray outdoors or in a well-ventilated area (always read the manufacturer's safety instructions for sprays), apply light coats from about 12 inches away rather than one heavy blast. Heavy coats fill fine detail and take much longer to dry.
Color matters here. A grey primer is the safest all-purpose choice because it sits between light and dark and will not heavily tint your base colors. Black primer makes shadows deeper automatically but can make it harder to paint bright colors. White primer makes colors more vivid but shows every missed spot.
For most beginners, grey primer and decent ventilation is all you need to know.
Step 2: Base Coat Your Colors
Once the primer is fully dry, you lay down base colors. A base coat is a single flat color applied to each area of the model: skin tone on the face and hands, cloth color on the cloak, metal on the armor, and so on.
The goal at this stage is coverage, not blending. You are not trying to make the model look finished. You are mapping out which areas are which color.
A few practical notes:
- Use slightly thinned paint. One or two drops of water on the brush keeps the paint from sitting thick and hiding detail. Thick paint is one of the most common beginner mistakes.
- Two thin coats beat one thick coat. Let the first coat dry before adding a second pass to fix any gaps.
- Do not rush. Base coating is the least exciting stage, but rushed base coats make everything after it harder.
Read more about getting clean coverage in the guide on base coating miniatures.
Step 3: Apply a Shade (Wash)
This is where the model suddenly starts to look like something. A shade is a very thin, dark paint that flows into the recesses of the model, the gaps between fingers, the folds of a cloak, the joints in armor. It does this on its own through capillary action, without any special skill from you.
The result is automatic depth and shadow. The flat base colors that looked a bit dull now have contrast because the low areas are darker than the raised surfaces.
Pre-made washes and shades are available from several paint ranges and are beginner-friendly because they are already formulated to flow correctly. You apply them over the base coat, let them pool into the recesses, and step away while they dry. No blending needed.
One thing to watch: if a wash pools too heavily on a flat surface (like a cloak that has no texture), it can leave a tide-mark ring when it dries. A light touch and not flooding the whole model at once helps with this.
The full technique is covered in the guide on how to use washes to shade your miniatures.
Step 4: Highlight the Raised Areas
After the shade dries, the model has shadow in the recesses. Highlighting adds the opposite: brighter color on the parts that catch light. Edges of armor plates, the tops of fabric folds, the ridge of a nose, the knuckles on a fist.
For beginners, there are two main approaches:
Drybrushing is the fastest method and works well on textured surfaces. You load a brush with paint, wipe most of it off on a paper towel until almost no paint transfers, then lightly drag the brush across raised surfaces. The near-dry brush catches only the highest points. It is fast, forgiving, and extremely satisfying for things like fur, hair, and chainmail. See the beginner guide on drybrushing miniatures.
Edge highlighting is a more controlled technique. You pick up a small amount of a lighter version of your base color and carefully paint a thin line along edges and raised points. It looks more precise and works better on smooth armor or cloth, but takes more practice to keep lines thin.
Most beginners start with drybrushing and add edge highlighting as their brush control improves. Both are valid. Neither one is the only right answer.
A Quick Reference: The Four Steps at a Glance
| Step | What You Apply | Why It Comes Here |
|---|---|---|
| Prime | Primer (grey, black, or white spray or brush-on) | Adhesion base for all paint layers |
| Base coat | Flat acrylic colors, one per area | Maps out all the colors before any shading |
| Shade | Thin wash into recesses | Adds instant shadow and depth over dry base coats |
| Highlight | Lighter color on raised edges | Brings back contrast that the wash softened |
The sequence works because each step builds on the previous one. Shading only reads well over a flat base coat. Highlights only stand out because the shade darkened the recesses. Skipping or reordering steps is possible, but starting with this four-step order gives you the most predictable results.
What About Basing and Varnishing?
These two steps happen after the four-step painting sequence is complete.
Basing means adding texture and color to the round plastic base the model stands on. Sand, flock, texture paint, and small stones are common materials. Doing the base at the very end means you will not accidentally get base materials on your freshly painted model during the earlier steps.
Varnishing seals and protects everything. A matte varnish removes any unwanted shine from the washes and leaves a clean, flat finish. A gloss varnish protects more durably and is useful for models that see a lot of handling during games. This is the final step before the model goes on the table.
Frequently Asked Questions
Do I have to follow this exact order every time?
For your first models, yes, this order is the most reliable. Experienced painters sometimes change the sequence for specific effects, but those are exceptions built on understanding why the standard order exists. Start with prime, base, shade, highlight and you will have a working process.
Can I skip priming if I am in a hurry?
Skipping primer is the single mistake most likely to ruin a finished model. Paint applied directly to bare plastic can peel, and all the work on top goes with it. Primer takes 15 to 30 minutes to dry and costs very little. It is not optional.
How long should I let each step dry before moving on?
Base coats dry in 10 to 20 minutes under normal conditions. Washes can take 30 minutes to an hour to fully cure in recesses. Rushing a still-wet wash with a highlight brush will smear it. When in doubt, wait a little longer.
My wash looks too dark and blotchy. What went wrong?
Usually this means too much wash was applied at once. Try applying it in smaller sections, letting each area dry before moving on. You can also apply it only in recesses (recess shading) rather than all over the model. Washes lighten noticeably as they dry, so a wet wash that looks alarming often settles to something much more reasonable.
Do the base coat colors need to be perfect before I shade?
They do not need to be perfect, but they should be reasonably solid and dry. Small gaps or thin spots will look worse after the wash because the shade will pool where the base coat is thin and show through to the primer underneath. Two solid base coat passes are worth the extra few minutes.