How to Use Washes to Shade Your Miniatures
Learn how to use washes on miniatures to add instant depth and shadow. Covers all-over vs pinwash, tide marks, and ready-made vs homemade washes.
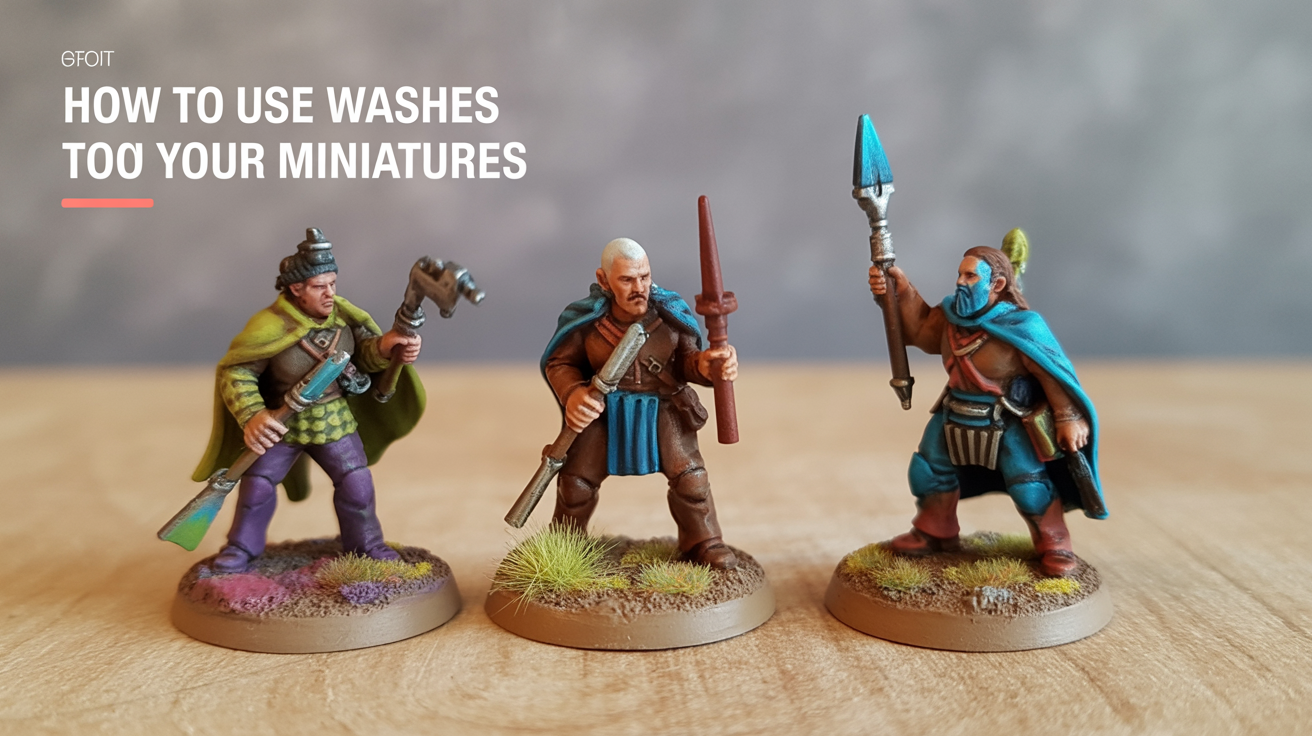
A wash is a thin, heavily diluted paint that flows into the recesses of a miniature and pools there, creating instant shadows without careful brushwork. Knowing how to use washes on miniatures is one of the highest-value skills you can pick up early because a single coat can transform a flat base-coated model into something that looks genuinely painted. It takes about two minutes to apply and does most of the shading work for you.
What a Wash Actually Does
Paint on its own has no reason to settle in any particular spot. It dries wherever you put it. A wash is different because it is formulated (or mixed) to have very low surface tension, so gravity and capillary action pull it toward the lowest point on the surface, which is exactly where shadows belong: around chainmail rings, between fingers, inside eye sockets, along panel lines.
Most hobby-brand washes also contain a flow improver and a small amount of gloss medium. The flow improver helps the liquid move freely before it dries. The gloss medium reduces the "tide mark" problem (more on that in a minute). When the wash dries, it leaves a thin, transparent layer of darker pigment in every groove and crease, making the detail pop without you having to paint each shadow individually.
This is why washes are often the first "advanced" technique beginners pick up right after base coating their miniatures. The technique requires almost no brush control, and the results are immediate.
All-Over Wash vs. Pinwashing
There are two main ways to apply a wash, and choosing between them depends on what you are painting and how much control you want.
All-Over Wash
An all-over wash means loading your brush and painting the wash across the entire surface of the model (or at least an entire large section of it). The wash flows everywhere and shades every recess at once. This is the fastest method and works well on:
- Infantry models with lots of small detail (armor, pouches, belts, buckles)
- Textured surfaces like fur, scales, or chainmail
- Skin tones, where you want soft, natural-looking shadow transitions
- Any situation where speed matters more than precision
The trade-off is that an all-over wash can slightly dull the midtone colors underneath. On bright colors like yellow or white, this can be particularly noticeable. Many painters follow an all-over wash with a highlight pass to restore the brightness on the raised areas, which is exactly what drybrushing is designed to do quickly and efficiently.
Pinwash (Recess Shading)
A pinwash (also called recess shading) is the opposite approach. Instead of flooding the whole surface, you use a very fine brush to place small amounts of wash only in the specific recesses and panel lines you want to shade. The rest of the surface stays untouched.
This technique takes more time and a steadier hand, but it has two major advantages. First, it preserves the brightness and saturation of your base coat almost completely. Second, it gives you very precise control over where the shadow goes, which matters a lot on smooth surfaces like vehicle panels or Space Marine shoulder pads where a messy all-over wash would look muddy.
Pinwashing is also worth learning before you start layering highlights, because both techniques work on similar logic: you are controlling exactly where light and shadow live on the surface.
Choosing the Right Wash Color
Wash color choice sounds complicated, but there are a few dependable rules:
| Base Color | Recommended Wash | Notes |
|---|---|---|
| Grey, white, silver | Black or dark grey | Strong contrast, great for metallics |
| Brown, leather, bone | Brown or sepia | Warm tone, natural feel |
| Skin tones | Flesh tone or sepia | Preserves warmth better than black |
| Green (armor, scales) | Dark green or black | Depends on how dark you want shadows |
| Gold, brass | Brown or flesh tone | Black wash on gold looks muddy |
| Blue | Dark blue or purple | Keeps the color family consistent |
| Red | Dark red or brown | Black tends to push red toward grey |
The general principle is to stay within the color family or go one step warmer or darker. Pure black wash is extremely versatile, but on warm colors it can look cold and artificial if overused.
How to Apply a Wash Without Problems
Technique matters more than the specific product. Here is a repeatable process that avoids most beginner pitfalls:
- Make sure your base coat is fully dry. Wash applied over wet or even slightly tacky paint can lift or streak. If in doubt, wait an extra ten minutes.
- Load the brush moderately. The brush should be wet enough to flow freely but not so loaded that you are dripping. Wipe the brush on the edge of your palette to remove excess.
- Work in sections on larger models. Start at the top of the miniature and let the wash flow downward. On infantry, you can often do the whole model in one pass. On large vehicles, do one panel at a time.
- Let it flow naturally. The wash will find the recesses on its own. Resist the urge to brush it around aggressively, which creates streaks.
- Wick away pools on flat surfaces immediately. If wash pools on a flat area (like the top of a shoulder pad), use a clean, slightly damp brush to wick it up before it dries. Dried pools look like puddles and are harder to fix.
- Do not touch it until it is fully dry. This usually takes ten to twenty minutes depending on humidity. Prodding a half-dry wash creates drag marks.
Tide Marks and How to Avoid Them
Tide marks are the single most common problem beginners hit with washes. They look like a faint ring or stain left behind at the edge of where the wash dried, and they are caused by the pigment separating from the medium as the water evaporates.
The conditions that cause tide marks:
- Applying the wash over a matte surface (matte paints have a rough texture that breaks the wash's flow and causes uneven drying)
- Using a very diluted homemade wash without a flow improver or gloss medium
- Applying the wash too thickly in one spot so the liquid takes longer to dry
The most reliable prevention is to apply a coat of gloss varnish over your base coat before washing. Gloss varnish creates a smooth, non-porous surface that the wash flows across cleanly and dries evenly. Once the wash is dry, you can re-apply matte varnish to bring the sheen back down. This sounds like extra steps, but it almost completely eliminates tide marks and is a standard practice among experienced painters.
If you are using a commercial wash product, many are pre-formulated to resist tide marks on bare paint, especially on slightly textured surfaces. Even so, very smooth or large flat areas can still cause problems, so the gloss-first habit is worth developing.
Ready-Made Washes vs. Homemade Washes
Both approaches work. The choice comes down to convenience versus cost and flexibility.
Ready-Made Washes
Commercial washes from hobby brands are pre-mixed to the correct consistency and include flow improvers and binding agents. They are consistent, reliable, and available in a wide range of colors. The main downside is cost: a single pot can run $4 to $7, and if you are batch-painting a whole army, you can go through several pots quickly.
Ready-made washes are the easiest option if you are just starting out or if you only paint occasionally.
Homemade Washes
You can mix your own wash using:
- A small amount of acrylic paint (any color)
- Water (for thinning)
- Flow improver (a few drops reduce surface tension)
- Acrylic medium or matte medium (optional, helps the wash flow more smoothly and bind to the surface)
- A drop of dish soap (a very small amount reduces surface tension in a pinch)
The standard ratio is roughly one part paint to five to ten parts water, with a few drops of flow improver. Experimentation is necessary because the correct consistency depends on the paint brand, room temperature, and the surface you are painting. You want the mix thin enough to flow freely but concentrated enough that the dried result is visible.
Homemade washes give you total control over color and can be made in any hue you want, including colors that commercial lines do not offer. The main challenge is consistency: every batch is slightly different, and getting the dilution wrong produces either a puddle that ruins the base coat or a wash so pale it adds nothing.
A practical middle ground is to buy one or two commercial washes in the colors you use most often (a dark brown and a black), and mix custom colors only when you need something specific.
Frequently Asked Questions
Do I need to seal my miniature before applying a wash?
You do not have to, but a coat of gloss varnish before washing significantly reduces tide marks and helps the wash flow evenly. It is especially useful on smooth surfaces or pale colors. After the wash dries, apply matte varnish if you want to reduce the sheen.
Can I apply a wash directly over bare plastic or resin?
Yes. Most hobby washes stick fine to primed plastic or resin. Just make sure the surface is primed first, as paint (including washes) does not bond reliably to bare, unprimed plastic.
How do I fix a wash that has dried in the wrong place or left a stain?
Let it dry completely, then paint over the problem area with your base coat color to re-establish the midtone. You can then re-apply the wash more carefully. On very large flat areas, sanding lightly after the wash dries and repainting is sometimes the cleanest fix.
Can I apply more than one wash to the same area?
Yes, layering washes deepens the shadows progressively. A common approach is to apply a broad wash over the whole area first, let it dry, then apply a second more targeted wash only into the deepest recesses for extra contrast. Just let each coat dry fully before adding another.
Do I need a special brush for washing?
Not really. A medium-sized soft brush (size 2 to 4 round, or a flat wash brush) works well for all-over washes. For pinwashing, a size 1 or 0 with a fine point gives you better control. Avoid brushes with stiff bristles, as they can leave drag marks.