How to Use a Wet Palette for Miniature Painting
Learn how to use a wet palette for miniatures, keep paint workable longer, and make your own DIY version with everyday supplies.
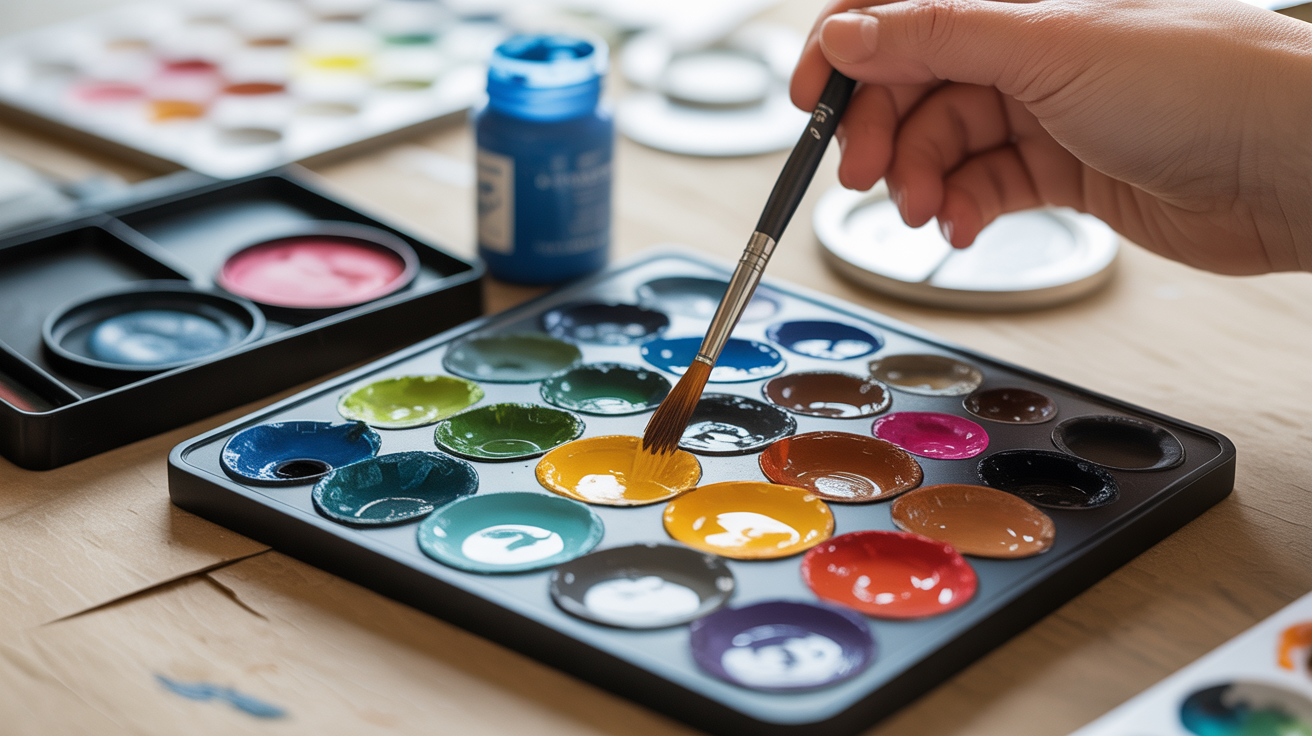
A wet palette for miniatures solves one of the most frustrating beginner problems: paint drying on your palette before you can use it. By keeping a thin layer of moisture under your paint, it stays workable for hours instead of minutes, which matters a lot when you're blending or layering on small surfaces.
Why Use a Wet Palette for Miniatures
Standard plastic palettes and tile palettes work fine for quick jobs, but acrylic paint dries fast, especially in a warm room or under a hobby lamp. You mix the perfect shade, turn to grab your brush, and the paint has already skinned over. On a miniature, that dried skin clogs bristles and drags across the surface instead of flowing smoothly.
A wet palette fixes this by feeding moisture up through a membrane into the paint above. The paint thins slightly over time (controlled evaporation), but it stays liquid and blendable. That extra working time is especially useful for wet blending, smooth gradients, or painting skin tones where you need one colour to melt into the next.
There are also practical storage benefits. Many wet palettes come with lids. Close the lid at the end of a session and your paint stays usable for another day, sometimes two or three, without drying out at all. That cuts down on wasted paint and wasted mixing time.
If you are curious about the paints themselves, including how contrast paints and washes behave differently, this guide on miniature paints covers the main types.
What Is a Wet Palette Made Of
Every wet palette, bought or homemade, has the same three parts:
- A shallow container with a lid. The lid traps humidity so moisture does not evaporate too quickly between sessions.
- A moisture reservoir. Usually a sponge, a folded paper towel, or a dedicated foam insert. This holds the water and releases it slowly upward.
- A membrane. Parchment paper (baking paper) or a purpose-made hydration paper. This sits on top of the reservoir and is where you actually put your paint. The membrane passes moisture through to the paint but does not let water pool on the surface.
Commercial options from brands in the hobby space use engineered foam and a thicker membrane paper, which tends to last longer and resist tearing. For beginners, a DIY version is almost identical in performance and costs next to nothing to set up.
How to Make a DIY Wet Palette
You need three things: a container with a lid, something absorbent, and parchment paper. That is it.
What You Need
- A shallow plastic container with a snap-on or press-fit lid. A takeaway food container, an old lunch box, or a craft supply case all work. Aim for something between 15 cm and 25 cm wide so you have room to mix.
- A sponge cut to fit the base, or two to three layers of paper towel. The sponge holds more water and dries out more slowly between sessions.
- Parchment paper (baking paper), cut to fit on top of the sponge layer. Do not use wax paper. Wax paper repels moisture rather than allowing it to pass through.
Step-by-Step Setup
- Cut the sponge or paper towels to fit the base of your container with no gaps at the sides.
- Wet the sponge or paper towels thoroughly with clean water. Press out the excess so the material is saturated but not sitting in a puddle. If water pools visibly, tip the container and drain it.
- Cut a sheet of parchment paper to the same size as your reservoir layer. Set it flat on top of the wet sponge.
- Press the parchment gently with a fingertip. You should see a tiny amount of moisture bead on the surface within a few seconds. If the surface stays bone dry, add a bit more water to the sponge. If water streams across the parchment, drain some off.
- Drop a small amount of paint onto the parchment and start painting. The paint should thin very slightly from the moisture below.
That is the full setup. After your session, put the lid on. The next day, check that the sponge still has moisture. If it has dried out, add water through the edge of the parchment rather than lifting it off.
Parchment Paper vs Purpose-Made Membrane Paper
Standard parchment paper is fine for beginners. It is cheap, easy to find in any supermarket, and works well for basic layering and blending. The downside is that it tends to curl at the corners when wet and can tear if you push too hard with a brush.
Purpose-made hydration paper (sold by wet palette manufacturers as refill packs) is heavier, more consistent, and lies flat without curling. If you find you are using your wet palette every session, upgrading to the proper paper is worthwhile. The sponge refills are also denser than a kitchen sponge and hold water more evenly.
How to Use a Wet Palette Effectively
Setting one up is the easy part. Getting the most out of it takes a little adjustment.
Loading Paint Correctly
Put less paint on the palette than you think you need. A drop the size of a match head is a good starting point for a single session. The moisture from below will slowly thin the paint, so you want to start on the thicker side. If you load a large blob, the outer edges will thin while the centre stays thick, giving you uneven consistency.
For thinning paints to the right consistency, the wet palette already does some of the work for you. You will likely add less water from a separate dropper than you would on a dry palette.
Mixing on the Wet Palette
You can mix colours directly on the parchment. Keep mixes in separate sections of the paper and leave some clear space between them. If you mix too close to the edge or another colour, they bleed together as the moisture moves around under the paper.
Cleaning and Refreshing
Between sessions, if the sponge feels dry when you open the lid, add a few drops of water at the edge. You do not need to lift the parchment off to re-wet it. If paint has dried on the surface of the parchment in a previous session, you can sometimes rehydrate it by adding a tiny amount of water on top and giving it a minute to soften. If it has fully dried and cracked, just swap in a fresh piece of parchment.
Mold Prevention
Mold is a real issue with wet palettes, especially in warm or humid climates. Paint sitting on a moist surface for days will eventually grow mold. A few simple habits keep it in check:
- Change the sponge or paper towel completely every one to two weeks.
- Do not leave paint on the palette for more than three or four days at a time. Scoop it off or replace the parchment.
- Add a very small drop of distilled water rather than tap water when possible. Tap water contains minerals and sometimes bacteria that accelerate mold growth.
- Keep the lid on when not in use to avoid dust, but open it briefly each day to let fresh air in if you are storing paint overnight.
Some painters add a tiny drop of dish soap to the reservoir water. It lowers surface tension and helps moisture distribute more evenly through the sponge. It does not affect the paint above.
Pairing a Wet Palette with the Right Brushes
A wet palette keeps your paint in better condition, but it works best alongside brushes that hold paint well and release it at a controlled rate. Synthetic brushes with a good point are easier to keep clean when wet blending on the palette, since you are frequently picking up and blending small amounts. A guide to choosing brushes for miniature painting covers the main types and what each one is suited for.
Natural hair brushes (kolinsky sable) also work very well with a wet palette. The softer belly holds a larger reservoir of thinned paint, which suits the fluid consistency the wet palette produces.
Frequently Asked Questions
Can I use a wet palette with contrast paints or washes?
You can, but it is not ideal. Contrast paints and washes are already very fluid and are designed to be used straight from the bottle or diluted with their own medium. Placing them on a wet palette thins them further, which can make them too watery for their intended effect. A small tile or dry palette works better for those paint types.
How long does paint last on a wet palette?
With the lid on, standard acrylics can last two to three days before they dry or become too thin to use. Some painters report longer, depending on room temperature and the quality of the seal. Without the lid, expect a few hours at most.
Does a wet palette work with oil paints?
No. Oil paints are not water-based, so the moisture from the reservoir does nothing for them. Wet palettes are designed specifically for acrylics and water-based paints.
My paint keeps going watery. What am I doing wrong?
The sponge is probably too saturated. Tip the container slightly and drain out any standing water until the sponge is moist but not waterlogged. The parchment surface should feel just barely damp, not wet. You can also try using fewer layers of paper towel to reduce the total water capacity.
Is a commercial wet palette worth buying, or is DIY good enough?
For most beginners, a DIY version is genuinely good enough. The main advantages of a commercial palette are a better lid seal, a more consistent foam insert, and heavier membrane paper that does not curl. If you paint regularly, a commercial option is a modest upgrade. If you are just starting out, a takeaway container and parchment paper will serve you well while you decide how much you enjoy the hobby.