How to Add Flock, Grass Tufts, and Static Grass
Learn how to use static grass, grass tufts, and flock to finish miniature bases with a natural, realistic look. Step-by-step PVA glue method inside.
Grassy bases can make an ordinary miniature look like it belongs in a diorama. A little flock, a few pre-made tufts, or a pinch of static grass applied over a painted base is often the difference between "tabletop ready" and something that genuinely catches the eye. This guide walks through each material, how to apply it, and the small habits that keep results looking intentional rather than glued-on.
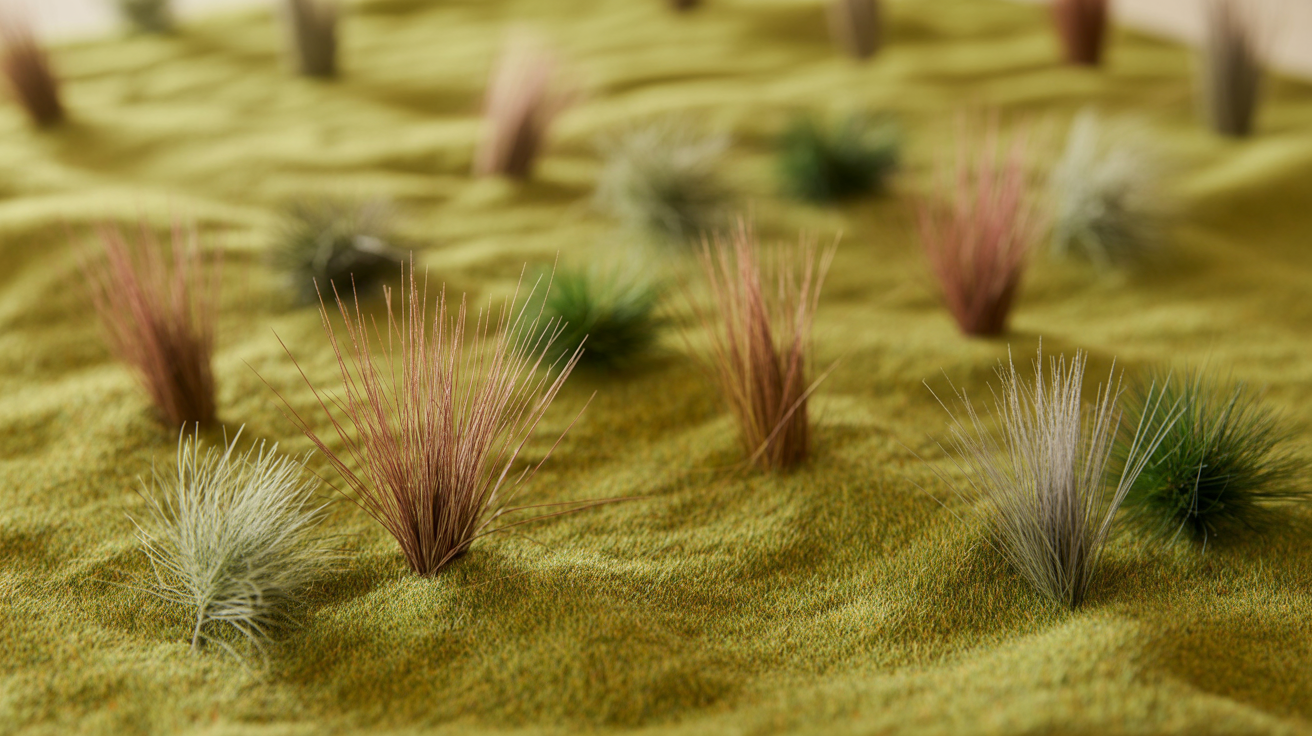
Flock, Tufts, and Static Grass: What's the Difference?
All three create a grassy effect, but they behave differently and suit different situations.
| Material | What It Is | Best For |
|---|---|---|
| Flock | Fine foam or fiber granules, usually 0.5–2 mm | Covering large base areas, meadow texture, quick application |
| Static grass | Longer fiber strands (2–12 mm) charged to stand upright | Realistic upright grass, taller growth, more visual depth |
| Grass tufts | Pre-made clumps on a backing sheet | Fast detailing, consistent shapes, no mess |
Flock is the oldest and cheapest option. It lies flat and reads more as "short grass" or "moss." Static grass stands up because the fibers carry an electrostatic charge, which makes the strands orient vertically. Tufts are the most convenient: peel off the backing, apply a dot of glue, press down, done.
Most finished bases use a mix. Flock for the broad fill, static grass for taller accent patches, and a tuft or two near the model's feet for grounding.
Before you start any grass work, make sure the base texture is already painted and dry. If you have not done that yet, simple basing ideas and textures for beginners covers the groundwork.
What You Need
For flock and static grass:
- PVA (white) glue, thinned slightly with water (roughly 2 parts glue, 1 part water)
- A small brush or a cocktail stick for applying glue
- Flock or static grass of your choice
- A small dish or scrap paper to catch excess
- Optional: a static grass applicator
For grass tufts, all you need is superglue or undiluted PVA and tweezers. Tufts have their own backing that holds their shape, so no special tools are required.
A static grass applicator is a small battery-powered device that charges the fibers and makes them stand upright. It is genuinely useful for 6 mm fibers and longer. For 2–4 mm static grass, you can skip the tool and still get acceptable results by sprinkling from height and tapping the base. The applicator becomes more worthwhile the taller and more realistic you want the grass to look.
Applying Flock: Step by Step
Flocking miniature bases is simple. The main thing to get right is glue coverage and not overdoing it.
- Paint the base texture first and let it fully dry. A painted base shows through gaps in the flock and that is fine, even good, as long as it is the right color.
- Mix PVA with a small amount of water until it flows easily off a brush but is not runny.
- Dab the glue wherever you want flock to sit. Leave some areas bare to show rock, dirt, or painted ground. Covering the entire base with flock looks unnatural and hides the work underneath.
- While the glue is wet, pinch a small amount of flock and sprinkle it over the glued areas. Work over a sheet of paper so you can funnel the excess back into the pot.
- Press the flock gently with a fingertip or the back of a brush to help it stick.
- Shake off the loose material and let the base dry completely, at least 30 minutes. An hour is safer.
- Tip the model over scrap paper and tap the base. Anything that falls off was not stuck. You can touch up those spots with a second thin layer of glue and repeat.
That is the full process. Once you have it down, a base takes about five minutes of active work.
How to Use Static Grass on Miniatures
Knowing how to use static grass on miniatures opens up more interesting textures than flock alone can produce. The fibers are longer and, if charged, stand upright to read as actual grass blades.
Without an applicator:
- Apply PVA glue to a defined patch, not the whole base.
- Pinch a small bunch of static grass fibers and hold them a few centimeters above the glue.
- Drop them in a pinching motion so they fall with some separation.
- Tap the sides of the base sharply. This vibration helps the fibers orient more vertically.
- Blow gently across the base to shift any fibers lying flat.
- Let dry fully before touching.
With a static grass applicator:
- Load the cup or mesh of the applicator with a small pinch of grass.
- Apply PVA to the base area and let it sit for 30 to 60 seconds until it is tacky but not completely wet.
- Connect the ground wire clip to a piece of metal or aluminum foil under the base.
- Hold the applicator a centimeter above the base and press the button in short bursts.
- The charge makes the fibers jump toward the glue and plant themselves vertically.
- Let dry without touching, then shake off the loose material.
The applicator really does make a visible difference on anything 6 mm or longer. On shorter fibers, the gap in results is smaller, so the manual method is fine for most beginner projects.
Use static grass in patches, not as a carpet. A few clusters surrounded by painted dirt or flock looks more credible than a uniform layer of upright fiber covering every centimeter.
Adding Pre-Made Grass Tufts
Grass tufts for miniatures are one of the few hobby shortcuts worth taking. They come pre-formed in consistent sizes and shapes, from low sparse patches to tall wispy clumps.
- Choose tuft sizes that feel proportional to the base. A 6 mm tuft on a 25 mm base is about right; the same tuft on a 20 mm cavalry base can look oversized.
- Place the model on the base first and mark where the feet land. Tufts look best near the edges or between the feet, not directly under the model.
- Put a small drop of superglue or undiluted PVA on the base. Superglue grabs faster; PVA gives you a few seconds to reposition.
- Use tweezers to peel a tuft from its backing sheet and press it onto the glue dot.
- Hold for five seconds, then release.
That is it. Tufts are forgiving. If one ends up in the wrong spot, slide a thin blade under it while the glue is still soft and reposition.
You can mix tuft sizes on a single base. Taller tufts at the back or edges, shorter ones toward the front, naturally suggests a bit of depth. A single large tuft behind the model's legs can frame the miniature and add visual weight without looking busy.
Sealing and Protecting Grass Effects
This step is worth getting right. Most grass materials are foam or fiber and they absorb matte varnish in a way that makes them look wet or dark. Spraying directly on grass tufts will often flatten or discolor them.
The safer approach:
- Seal before grass. Apply your final varnish to the painted base before adding any flock or tufts. Let it cure for at least a few hours, then add the grass.
- If you need to seal after, use a brush-on matte medium diluted heavily with water and apply it sparingly around the base of the grass rather than over the top. Avoid aerosol varnish directly on tufts.
- PVA itself seals flock reasonably well. A thin coat of diluted PVA painted over dry flock, left to cure clear, locks the fibers in place without flattening them as much as varnish does.
For handling durability, the PVA seal is usually enough for a display piece. Gaming miniatures that get shuffled around a table regularly may need a light brush-on matte varnish on the base edges and soil areas, keeping the spray off the grass itself.
The base rim should also be painted a flat, dark color (typically dark brown or black) after all grass work is complete. That step is covered in more detail in how to paint and finish the base rim.
For a full overview of getting from raw base to finished result, how to base a miniature: a beginner's guide ties each step together.
Frequently Asked Questions
How much of the base should I cover with grass?
Leave at least a third of the base visible as painted ground, dirt, or texture. Full grass coverage can make a base look toy-like. Patchy, uneven placement looks far more natural.
Can I mix flock and static grass on the same base?
Yes, and it usually looks better than using either alone. Apply flock across the broader areas first, let it dry, then add static grass in smaller accent clusters on top of or adjacent to the flock.
Do I need a static grass applicator to get good results?
Not for 2–4 mm fibers. Sprinkling from height and tapping the base gives reasonable results. For 6 mm fibers and longer, an applicator makes a clear difference and is worth buying if you plan to base more than a few models.
My tufts keep falling off. What am I doing wrong?
The most common cause is too little glue or glue that had already started to skin over before the tuft was pressed down. Use fresh superglue or apply PVA and press the tuft within 20 seconds while the surface is still wet.
Will varnish ruin my grass tufts?
Aerosol matte varnish sprayed directly on tufts often dulls and slightly compresses them. Seal the base before adding tufts, or use a diluted brush-on matte medium applied only around the base of the grass to avoid changing the tuft's appearance.